Monday, February 8, 2010

Handmade Card

Fabric Card

I saw this post from MADE and thought it was a brilliant idea. I decided to make this simple one to give to my mom for Valentines Day. I even used some of her fabric that she gave me a few years ago when I was visiting.

Here's some other cute fabric card ideas from MADE and Old Red Barn Co.

Thursday, January 28, 2010

Mail Love

Love it!!

Quiltin' Like Crazy had an online garage sale and I was lucky enough to be the 1st one to claim these two quilt tops!! The 2nd one is supposed to be the back of a quilt, but I think it's too pretty to be the back, so I'm going to make it the front :)

I'll be able to get a lot of practise stippling on these two, since they are already done for me. I really need the practise too!

Thursday, January 14, 2010

Talented Boy

Japanese Pendant

Takeshi (my 15 year old) made this pendant for one of his school mates. He hand carved it out of a block of pine and engraved the japanese letters with a wood burner. The japanese is her last name in kanji. I think he did a great job! I wouldn't mind a gift like this from him someday :)

Sunday, January 10, 2010

First Attempt at Stippling

Closeup

I trying to learn how to free motion quilt, and thought a (very) small project would be a good way to start. I used Sew, Mama, Sew's Doll Quilt Sew Along to make this doll quilt for Hannah. It measures about 16 x 19 and is the perfect size for any baby doll. It was harder than I thought, but hopefully I'll get better with practise (lots and lots of practise). There were no puckers on the backside, so I consider that a success.

Here's the quilt, with just the binding needed. Hannah loves it.

As I finished stippling the quilt, I looked at my thread and saw it was totally empty! I thought I would have to go back and redo some quilting, but thankfully my thread had just run out!

Perfect planning on my part, I guess :)

Tuesday, January 5, 2010

Fabric Covered Notebooks

Presents for my 5 nieces

I made these the day before we left for Utah. They are very easy to sew and I used the same color thread for all 5 so I could sew assembly line style. This is the second time I made this pattern and this time I remembered to wash the fabric first! The pattern is from Skip to My Lou who has a wonderful blog!

I let the girls pick which one they wanted when we arrived in Utah. They were so sweet and said how much they loved them.
I put a fun colored gel pen in each pocket. Hannah picked out which pen went to which notebook. The fabric for the notebooks is Woodland Bloom from Pink Fig.

Friday, December 25, 2009

Just in Time!

Working on Takeshi's Quilt

The boys Christmas quilts were finished just in time for Christmas, and I do mean just in time! I was pulling Ernest's quilt out of the dryer at about 11:00 pm on Christmas Eve, and had it ready to go by midnight. I will never again question the high cost of handmade quilts. There is so much work involved and it is very time consuming. Here's proof...
  • 3200 corners
  • 2000 yards of thread
  • 804 quilters safety pins
  • 160 finished blocks (480 total cut blocks)
  • 20 hours of machine quilting (just quilting the top, this does not include sewing the blocks together)
  • 19 bobbins used
  • 8 hours of hand binding (plus numerous scratches from dangerous pins)
  • 6 nights up till midnight (including 1 am and the midnight before Christmas)
  • 5 days in pajamas

Of course, I probably should have started sooner, 2 weeks before Christmas is not enough time! It was all worth it, Takeshi and Ernest LOVE their quilts and were wrapped up in them all day long.

Ernest's Fabric
(bottom fabric is for the back of the quilt)

Takehsi's Fabric
(bottom fabric is for the back of the quilt)

I followed Crazy Mom Quilts "How to Make a Ragged Squares Quilt" tutorial. It's very simple, and the top came together quickly, but progress slowed down when I started to machine quilt. It was very hard wrestling that much fabric into a machine for quilting. I swear I have bigger muscles now.

Takeshi's Finished Top

Another View

Hannah also helped me decided on the binding. Since this quilt had a scrappy look, we used all the long scraps to bind the edge. You can see the different fabrics along the edge in this picture.


Here's the back of Takeshi's quilt. You can see the square pattern here.


Hannah also participated in making the quilts. She helped me pick out which squares should go where, getting pins on blocks, & taping the quilt to get reading for basting.

Ernest has always loved blue, so here is his finished quilt.

Another View
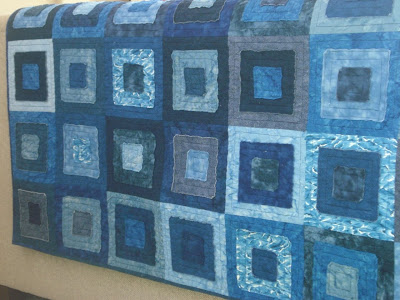
and the scrappy binding

Hannah is getting a quilt (purple, of course) but I ran out of time to finish hers. I'm going to started my presents for next year in February, I'm taking January off!

Scrabble Tile Pendants

Scrabble Tile Pendants

I decided to have Hannah made some Scrabble Tile Pendants for her brothers for Christmas. We decided to do Shaving Cream Art and pick our design from the finished picture.

Here is our finished art for Ernest's pendant.
Then I took a piece of cardstock and cut out a scrabble sized rectangle. We moved the hole around the picture until Hannah found a spot she wanted to use for the pendants.

Then we traced inside the rectangle and cut about 1" around it.

Here's our leftovers to recycle.

Here is the piece we are keeping. You want some around the edges so you can work with it easier.
Using tacky glue, glue your paper onto the scrabble tile and slice off the extra pieces of paper using an exacto knife.

Then we followed the tutorial from Make and Takes to get our finished product! The 1st two are for Hannah's brothers and the last one is for her!
And of course. the backside.