Saturday, April 7, 2012

Bunny "Tails"


It's nice when you own a printing company and can print every cute printable on the internet!  These adorable "Bunny Tails" printables are from eighteen25

Each of the marshmallow bags I bought had 28 giant marshmallows in them, making 14 "Bunny Tails" total.  My first choice was to use donut holes, but I couldn't find any bags that only had white donuts in them. But the marshmallows did turn out super cute. 


Friday, April 6, 2012

Scrabble Tile Place Settings

Finished Place Setting

I scoured the thrift stores and found a few scrabble games to make these place settings.  

I used a glue line, and cut off the amount I would need for each name

This way it's not permanent in case I need letters for something else.

The finished product!


Monday, March 12, 2012

Nursing Straps

Tutorial found here

These nursing straps are so quick and easy to make!  I've made nursing covers before, but this is an alternative that uses your "regular" blanket as a cover.  Basically you sew fabric that is 18 x 4.5 around drapery rings.  SUPER easy (and cool)!  The full tutorial from "I am Momma Hear me Roar" can be found here.


Saturday, March 10, 2012

Heart Clover/Shamrock Shirt

Tutorial found here

I wanted to make Hannah a "Lucky" shirt for St. Patricks Day, but she didn't like that idea, so I started looking for new ideas.  I came across this tutorial from iCandy and Hannah loved the shirt that she made.  

I used green fabric, a shirt from Savers, a heart template (downloaded from the internet) and some Heat n Bond.  

 Here's Hannah's "serious" look

and her "model" pose.

I love that the fabrics are all from projects that my mom or I made.
Best of all, Hannah loves it!

Friday, December 30, 2011

Crayon Roll for Twist-up Crayons

Mushroom and Fairy Crayon Roll

Since Hannah has upgraded from "regular" crayons to twist up crayons, I decided to make her a new crayon roll.  I used the tutorial from Skip to my Lou, but changed the dimensions to fit the twist up crayons.

The pockets for each crayon are 3/4" wide

I also added two additional pockets, one at 3/4" for a pencil, and this one at 1" for a twist up eraser.
I used a 1/4" seam allowance on the entire piece.  

Outer Piece & Lining - 11.25" long and 8" tall
Inner Pocket - 11.25" long and 10" tall (folded in half so it measures 11.25" long and 5" tall
20" piece of cording and a cord stop

If you are just making one for 12 twist up crayons without the extra slots then it would measure 9.5" long (instead of 11.25" long)

Hannah's is SO into mushrooms right now this this fabric worked perfect!

The little fairies are cute too.

All rolled up which fits nicely into my purse, for drawing at restaurants.

The cord stop keeps everything nice and tight so no crayons slip out.

Friday, December 2, 2011

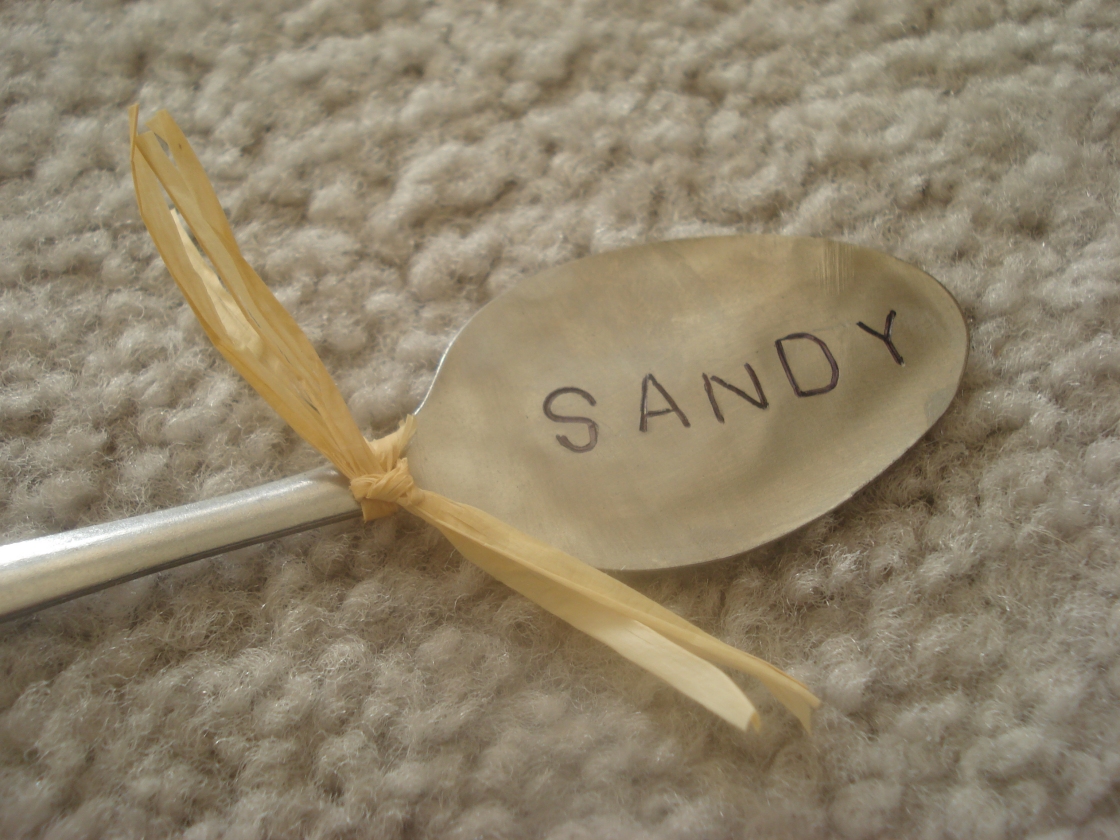
Hammered Spoon Place Settings

Finished Spoons!

Used for Place Settings!

I saw this idea on Pinterest and decided to make it for Thanksgiving, not realizing how hard it would be!  I ordered the stamping set from the recommended place on the tutorial, however I would not order from them again.


 I was overcharged for shipping (items shipped in a flat rate box) and the heavy items were only packaged with (free) cut up USPS boxes, no bubble wrap or protective packaging of any kind.  Everything arrived unharmed except for the plastic case the stamps were housed in, which was badly damaged.  

I found the exact same set at my local Harbor Freight for half price (on sale), normally $2.00 less for regular price AND no shipping costs.  The seller also claims that the stamps would last through 9000 stampings, but I only got about 5 stamps out of the letter "D".

You can see that the "D" is all smashed on one side and will not leave a good impression.  To the sellers credit, he told me to return the letter and he'd send me a new one.

Here are some tips that I hope will help those who might have this on their "to do" list.

1.  Use CHEAP/NOT QUALITY spoons.  I went for pretty first, buying spoons at my local thrift store.  Even though they were cheap in price, they were good quality spoons.  Surprisingly, even nice things get donated.  

We went with .50 spoons from target, but they wouldn't flatten. Who makes a quality spoon for .50?!? We finally went with .10 spoons from our local Restaurant Supply store. If the spoon bends easily you're in good shape.

2.  Make sure you have extra spoons.  I ended up with 16 finished names, and used 36 spoons!  
(yes, I messed up 20 spoons)  Luckily I had bought 48 spoons.

3.  Have the right supplies.  Quality Stamping Set, Hammer, Sledge Hammer, Metal Block, Tape and Cheap Spoons

4.  Use a metal block and small sledgehammer for flatting your spoons.  

Here's the side by side of a regular spoon and a flatten spoon.

Here's what happens when you use the concrete front porch steps to flatten spoons 
(instead of a metal block)

The spoon gets all scratched up too.

5.  Use a Metal Block to stamp your spoons.  Wood and other materials have too much "give" and won't make a good impression.

6.  Use tape to hold your block and spoon down.  

Every time the hammer hit the stamp, my metal block would "jump" and move the stamp slightly, resulting in this effect.

7.  Make sure you are stamping on the correct side.  Since your spoon is flat, it's easy to make that mistake. Note spoon below.

8.  Test out your letters on a "practice spoon". My J would get a great impression on the bottom, but not on the top.  The spoon above became one of my (many) practice spoons...

9.  Make sure your stamp is facing the correct way.  The "S" below is upside down, but since it's an "S", it didn't make a huge difference.

10.  You can use a thin sharpie to accent the letters.  You can also use the sharpie to fill in where you might not have gotten a good enough impression. (like the "A" and "N" in the spoon above)

Without Sharpie...

With Sharpie.

11.  Space out your stamping.  I had 16 names to do and with my mistakes, it ended up being a lot more.  Had I more time I would do about 5 a day. My hand was red and shaking after about 5, so I took about an hour break in between stampings.

12.  It won't be perfect, and be ok with that (something I'm not too good at).  After all, the imperfections are part of the charm and character of the spoon.

I also made a "Baby" one since one of the moms is pregnant :)

Everyone LOVED the spoons which made all the struggles worth every second!
Sunday, November 27, 2011

Quilt for Madelyn

Finished Quilt!!

After seeing the quilt I made for my sister, my sister-in-law requested one for her soon to be born baby girl.  I started on the quilt BEFORE the baby was born... but didn't finish it in time :(  

I finally got it done and will deliver it during our Thanksgiving visit. (although I have this post scheduled to post AFTER I give it to her!)

I used the "Vintage Baby Quilt" pattern again which I love!
The quilt pattern has rows of squares in a 14x14 pattern, and I had 14 different colors/designs of fabric for the squares.  This made it perfect for laying out the squares without having to repeat any pattern in a row.  I thought I could do this myself, but after I was 90% done laying out the squares, realized that I messed up somewhere and couldn't fit the last few squares in their rows without there being a duplicate pattern in the same row.  I know I could have left it, but I wanted it to be perfect...

SO I turned to Suduko!  
I found this Sudoku Site and printed out a 14x14 finished puzzle.

Then labeled my fabric.

To correspond with each letter in the puzzle

It made the process MUCH easier!

I crossed out each row as I laid them down

All done with the layout!

On the picture above there is a huge white strip on the right because the backing wasn't as big as the white cotton!

Luckily it just fit!!

And the finished quilt!!

The back..


the closeup...


and the binding.

I love the colors in this quilt and I know my sister-in-law will love it too!