Friday, December 25, 2009

Just in Time!

Working on Takeshi's Quilt

The boys Christmas quilts were finished just in time for Christmas, and I do mean just in time! I was pulling Ernest's quilt out of the dryer at about 11:00 pm on Christmas Eve, and had it ready to go by midnight. I will never again question the high cost of handmade quilts. There is so much work involved and it is very time consuming. Here's proof...
  • 3200 corners
  • 2000 yards of thread
  • 804 quilters safety pins
  • 160 finished blocks (480 total cut blocks)
  • 20 hours of machine quilting (just quilting the top, this does not include sewing the blocks together)
  • 19 bobbins used
  • 8 hours of hand binding (plus numerous scratches from dangerous pins)
  • 6 nights up till midnight (including 1 am and the midnight before Christmas)
  • 5 days in pajamas

Of course, I probably should have started sooner, 2 weeks before Christmas is not enough time! It was all worth it, Takeshi and Ernest LOVE their quilts and were wrapped up in them all day long.

Ernest's Fabric
(bottom fabric is for the back of the quilt)

Takehsi's Fabric
(bottom fabric is for the back of the quilt)

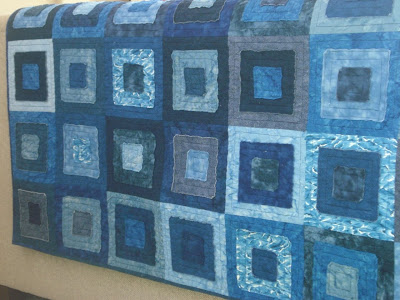
I followed Crazy Mom Quilts "How to Make a Ragged Squares Quilt" tutorial. It's very simple, and the top came together quickly, but progress slowed down when I started to machine quilt. It was very hard wrestling that much fabric into a machine for quilting. I swear I have bigger muscles now.

Takeshi's Finished Top

Another View

Hannah also helped me decided on the binding. Since this quilt had a scrappy look, we used all the long scraps to bind the edge. You can see the different fabrics along the edge in this picture.


Here's the back of Takeshi's quilt. You can see the square pattern here.


Hannah also participated in making the quilts. She helped me pick out which squares should go where, getting pins on blocks, & taping the quilt to get reading for basting.

Ernest has always loved blue, so here is his finished quilt.

Another View
and the scrappy binding

Hannah is getting a quilt (purple, of course) but I ran out of time to finish hers. I'm going to started my presents for next year in February, I'm taking January off!

Scrabble Tile Pendants

Scrabble Tile Pendants

I decided to have Hannah made some Scrabble Tile Pendants for her brothers for Christmas. We decided to do Shaving Cream Art and pick our design from the finished picture.

Here is our finished art for Ernest's pendant.
Then I took a piece of cardstock and cut out a scrabble sized rectangle. We moved the hole around the picture until Hannah found a spot she wanted to use for the pendants.

Then we traced inside the rectangle and cut about 1" around it.

Here's our leftovers to recycle.

Here is the piece we are keeping. You want some around the edges so you can work with it easier.
Using tacky glue, glue your paper onto the scrabble tile and slice off the extra pieces of paper using an exacto knife.

Then we followed the tutorial from Make and Takes to get our finished product! The 1st two are for Hannah's brothers and the last one is for her!
And of course. the backside.

Thursday, August 13, 2009

The Maddie Top!

A very happy girl!

When we returned from Hawaii we had a very special package waiting for us! It was the Maddie Top I won from Bits of Sunshine during the Sew, Mama, Sew! May Giveaway. Hannah loves it, and wears it as a dress, since it's a little large on her. Bits of Sunshine also has a FREE tutorial for this top and is selling a super cute finished top in her Etsy shop.

Thursday, July 16, 2009

Growth Chart

Growth Chart - Finally!!

I've had this on my "to do" list for many, many months now. Yesterday I got tired of seeing it on my list and decided to make it. I bought a 6 foot piece of molding at Lowes and the numbers I bought on ebay. All the numbers I saw at local craft stores were too large or too small.

I measured and made lines with a fine sharpie every inch and hot glued the numbers every foot. The chart is going to sit 1 foot off the ground, so there was no need for the number 1. I love the look of it, but I'm sure you could make it more colorful if you just had small children. I'm sure my older boys appreciate this look.

Now I just need to transfer the names, heights & dates from the wall to our new growth chart!

Thursday, July 2, 2009

Old Red Barn Quilt Along - Week 4

Finished Quilt Top

The top to the Old Red Barn Quilt Along is finally done! I love it, but I am VERY scared to quilt it. I have no scraps left over to make a small quilt and practise on, so I am going to make a few doll quilts from other fabric that I have. I am already 2 weeks (or is it 3) behind, so I'm sure this is going to set me back some more. Oh well... I took pictures of the quilt on a queen size bed, but the quilt is too small for the bed. I'm sure it would look great on a twin, but we don't have any twin size beds in our house.

I copied Crazy Mom Quilts idea and added a row of fabric to the top and bottom of the quilt, just to make it a little bigger. I think it looks great.

I had 39 squares and 13 small pieces. I made the quilt 6 squares wide by 6 squares long, using 36 squares. I am cutting down the last 3 squares to make a small row on the back, like Leisel did in this quilt (isn't she talented!). I used 12 of the 13 small pieces to make the extra row on the top and bottom of the quilt.

I think I might buy some extra fabric to make a couple pillowcases too....

Monday, June 22, 2009

Oh, Cherry, Oh!

10 Charm Packs!!

I just love this quilt by Quiltin' Like Crazy. I decided I wanted to copy her, so I bought these Charm packs on eBay. I just love this line!! I also found a light yellow sheet at Goodwill for $2.49 that I am hoping will match the yellows that are in this line.
This is only the 10th quilt that is on my "to do" list, so I'm not sure when it will get done! Luckly there is NO cutting on this one :)

Saturday, June 20, 2009

Old Red Barn Quilt Along - Week 3

12.25" Squares

I'm done with Week 3 of the Old Red Barn Quilt Along. My squares turned out to be 12.25" in size, instead of Dana's 11.5" size. This made my extra pieces 5" x 12.5" long. I have 39 squares and 13 extra pieces. Now to sew them together...

Wednesday, June 17, 2009

Old Red Barn Quilt Along - Week 2

My 2.5" Strips

Here's all my strips for Week 2 of Old Red Barn's Quilt Along. I'm supposed to be on week 5, but I'm just a little behind. I'm hoping to finish Week 3 tomorrow! I cut out all my 12 fabrics into 2.5" strips. I was able to get 7 strips out of all of them except for one! I cut it into a 2" strip instead and hopefully I can use it in a project sometime in the future.
Here's my lone 2" strip. It's too bad, this was my 2nd favorite fabric!!
This 2" strip is by Timeless Treasures

Monday, June 15, 2009

Foot #57

Patchwork Foot

Since I am going to be doing a lot of quilting, I decided to purchase the Patchwork Foot #57. this foot has a little guard on the edge so you can sew 1/4" seams perfectly! I will be using this foot a lot this week since the boys will be at Scout Camp and Hannah will be at Day Camp! I am hoping to get caught up on the Sew, Mama, Sew! Quilt Along during this time. (I'm only 4 weeks behind!)

Sunday, June 14, 2009

The Patchwork Skirt

(Did you notice the shoes?)

I finally finished "The Patchwork Skirt" by Pink Fig. I love her patterns and love the fabric her aunt (Lila Tueller) designs. All the fabric is Woodland Bloom by Lila Tueller. The pattern was very easy to put together and Hannah loves the skirt. The shirt is from Gymboree and I'm not sure if I want to embellish it or not.

Saturday, June 13, 2009

Sewing Machine Meme

June is Sewing Machine Month at Sew, Mama, Sew! I thought it would be fun to participate. It's still June, so I figure I'm not late yet :)

What brand and model do you have?
I have a Bernina 1530 Inspiration

How long have you had it?
My machine was bought on August 14, 1992. I've had the machine for almost 17 years!

How much does that machine cost (approximately)?
The machine cost me $2800.00 + $165.96 tax for a grand total of $3014.96. Yes, I still have the original receipt :)

What types of things do you sew (i.e. quilting, clothing, handbags, home dec projects, etc.)?
When I first bought the machine I did lots of paid sewing. I paid for my machine that way. Then when my boys were little I made clothes for them. Now I make some clothes for my little girl and am just getting started quilting. It's so much fun.

How much do you sew? How much wear and tear does the machine get?
I used to sew every day. As my boys got older, I used my machine less and less. I even thought of selling my machine at one point because I hadn't used it in a few years. Now that I have a little girl it gets used a few times a week. I am hoping to be using it every day, especially when my daughter goes to school.

Do you like/love/hate your machine? Are you ambivalent? Passionate? Does she have a name?
I love my machine! It works so well and I have never had a problem with it. She should have name, but she doesn't.... any suggestions?

What features does your machine have that work well for you?
I love the knee lift that lifts the pressure foot. I think that's my favorite feature. I also love the large backstitch button & the option to finish a stitch with the needle in the down position.

Is there anything that drives you nuts about your machine?
Nothing!

Do you have a great story to share about your machine (i.e., Found it under the Christmas tree? Dropped it on the kitchen floor? Sewed your fingernail to your zipper?, Got it from your Great Grandma?, etc.!)? We want to hear it!
When my son was about 1 (he's now almost 15) he climbed onto my sewing table and climbed behind my machine. Both wouldn't fit, so the machine crashed to the floor. Luckily it was carpeted and the only thing that was damaged was the 2nd metal thread holder on the top of the machine.

Would you recommend the machine to others? Why?
I would definitely recommend this machine. Bernina doesn't make this model anymore, but you can only buy it second hand (on ebay), but any Bernina would be a great choice. They are so user friendly and are great workhorses.

What factors do you think are important to consider when looking for a new machine?
Ease of use, Quality, User friendly & Features.

Do you have a dream machine?
Yes! It would be the Bernina 820 or 830.

Tuesday, June 2, 2009

Old Red Barn Company Quilt Along! - Week 1

My Supplies are Ready to Go!

Old Red Barn Co. is having a quilt along, so I thought it would be lots of fun to try and follow along. I'm only a week or so behind, but I figure I can let the housework slide so I can catch up :)

Here is my fabric. They are all from different lines, but I am hoping they all work together to turn out great.

The bottom fabric is going to be the binding.
Now, it's time to cut!

Monday, June 1, 2009

And the Winner is...

#12 - VanillaBean said...
They are all great! The drawing case caught my daughter's eye and she loves it so that would have to be my first choice, followed by the bag! Great material! Thanks!
Please contact me with your information! Your blogger profile is not accessible.

Wednesday, May 27, 2009

Sew, Mama, Sew Giveaway!

Here is my 1st Giveaway. Sew, Mama, Sew is hosting a "May Giveaway Day", and I thought it would be lots of fun to participate. Here are the rules...
  • One entry per person
  • Leave a comment telling me which ONE item you want (there are 3 to pick from)
  • Comments will be open until May 31st at midnight
  • Winner will be picked via Random.org
  • I will mail to the 50 United States (no international shipping at this time)
  • Item will be shipped by June 3rd
  • Good Luck!

Here are the three different items to pick from. Sorry, you only get one, but you can like them all :)

1. Reusuble Shopping Bag! (arrows will be in a different color)The original idea came from Elizabeth Kartcher and this post of hers. The bags are very sturdy and hold 2 gallons of milk side by side. I have my own set of these and use them everytime I go shopping. Here is my original post for this item.

2. Crayon Rolls! (you get to pick boy or girl colors)

Here's the online tutorial from Skip to My Lou that I followed to make these. Pictured above are some samples of crayon rolls that I've made and given away. You will get to pick if you want a boy or a girl crayon roll. I have trucks or airplanes for the boys, and pink butterfly fabric for the girls. Here is my original post for the crayon rolls.

Here's a picture of the crayon roll two ways.
Rolled up ready to travel and all laid out ready to color!

3. Little Artist Drawing Case!

I bought this super cute pattern from CraftApple.com. She has an amazing blog with lot of wonderful ideas, sewing tips and tutorials. Here's the drawing case closed. You will get this exact drawing case. Here's my original post for the drawing case.

Now DON'T FORGET to tell me which one you want!! I'll be checking out all the other giveaways too, so wish me good luck :)

Sunday, April 19, 2009

3 Pocket Tote

3 Pocket Tote

I wanted to learn the correct way to bind my quilts, so I took a binding class last Monday night at my local fabric store. We made this 3 Pocket Tote that is basically a 18" quilted square, hand bound on all 4 sides. I loved my class and Hannah loves the purse.

Here's the pattern

Here's one of the 2 side pockets
Here's the middle pocket
Closeup of my binding.

Here's our cute model with purse :)